Edit An Image In Word 2010
Although Microsoft Word is not an image editor, it can do some pretty impressive things to photos you insert into your documents. To showcase some of the image editing features of Word 2010, let’s look at an example.
First of all insert an image into a blank Word document: go to the Insert tab and click Picture, in the Illustrations group.
Navigate to the location of the image you want to insert and double click on it (or select it and click Insert). The picture will then appear in your document. This is the picture we’ll be working with in this example:
Awww. If you want to play along at home, right click on the image above and save it to your computer.
While the picture is selected you should see the Picture Tools contextual tab appear in the ribbon. This is just what we need – click the Format tab.
The first thing we’ll do is remove the background in the picture. Click Remove Background in the Adjust group. Press Enter, or click Keep Changes in the Background Removal tab. You should see the background disappear. This is what happens to the penguin picture:
Let’s add some Artistic Effects. Click on the Artistic Effects button and select an effect that takes your fancy. Glass looks good:
Click on the effect you want and it will be applied to your image. Here are our glassy penguins:
Because we want to keep our file sizes down, let’s optimize the image we’re working on. Click Compress Picture (again in the Adjust group), and click OK ( the default options should be enough). That should reduce the size of our document.
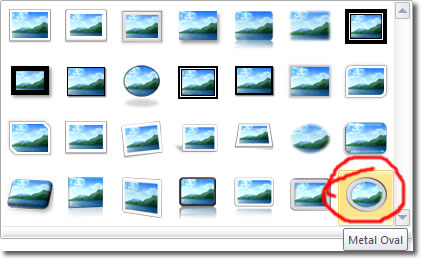
Let’s now put the penguins in an oval picture frame. Click on the More button in the Picture Styles group (the down arrow to the bottom right of the group). Click on Metal Oval.
That’s perfect.


